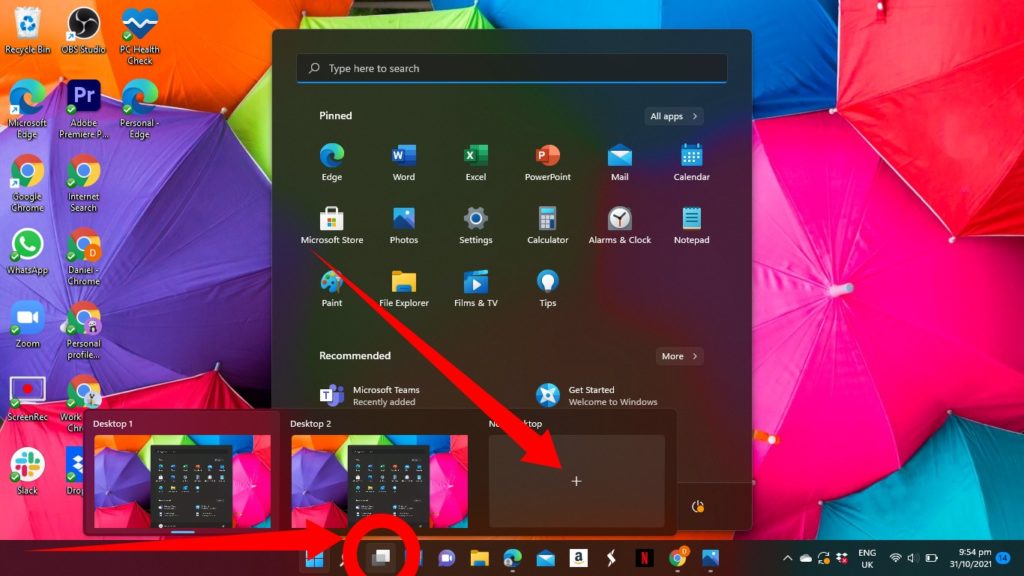
From our review of the Windows 11, it looks like Microsoft is prioritizing productivity. It comes with a couple of features that are designed to boost the productivity of users. The new Virtual Desktop feature is one such feature. It lets you add extra screens to your computer to help improve your work productivity. The feature is similar to the multiple monitors feature in Windows 10, but with new improvements. Instead of having one desktop housing all of your desktop apps, you can set up to separate your personal and work things, and switch between them when you want. Here is how.
How to Create Multiple Desktops in Windows 11
To create multiple desktops, make use of the Task view button in the taskbar – this should appear next to the search button (the Virtual Desktop icon looks like two overlapping squares), then tap the + sign in the New desktop space. If, for some reasons, you don’t find the Task view icon in the taskbar, you might have disabled it at some point. You will need to enable it to use it. To do this, right-click an empty section of the taskbar and tap Taskbar settings. Then, toggle-on Task view.
Using Multiple Desktops in Windows 11
To switch between virtual desktops, hover your cursor over the Task View icon and when the pop-up appears showing a preview of all your virtual desktops, place your cursor on the virtual desktop you would like to access. You can also name all your open Virtual desktop. This will make them easier to identify. To do this, right-click a preview and select Rename from the options that appear, then, type your preferred name and press Enter. To close any desktop, just tap the x button on the virtual desktop. Also, you should know that even after your virtual desktop is closed, all running foreground programs will be moved to the desktop. So you don’t have to worry about accidentally closing all your work.


